Practice F#maj Guitar Chord with Interactive Feedback
Want a structured chord roadmap instead of jumping between pages?
Go to the full guitar chords tutorial.

Are you ready to truly internalize the F#maj chord? Jump straight into our interactive fretboard tool to explore its voicings and refine your playing with real-time microphone analysis. This foundational member of the Major Chords family is built from three distinct notes: F#, A#, and C#, corresponding to the intervals Root (1), Major Third (3), and Perfect Fifth (5). You can also listen to the chord played as a strum or arpeggio, making it easier to connect theory with sound.
Understanding the theory behind these intervals is crucial to mastering the F#maj chord and its musical applications. As a major chord, it forms the backbone of countless songs, providing a sense of resolution and stability within any key. Dive deeper into how all chords are built with our Chord Construction guide. Many F#maj voicings involve barre shapes, so if you're working on those, our Guitar Bar Chords tutorial offers valuable tips. Once you've got the shape, focus on making smooth chord changes to integrate F#maj seamlessly into your playing.
Scroll down this page to discover a wealth of resources, including multiple F#maj chord diagrams ranked from the easiest open positions to more advanced barre shapes, along with deeper music theory explanations, popular songs featuring the F#maj chord, and the keys where it commonly appears. Before you explore the diagrams, take a moment to engage with the interactive tool above. Use the drum and BPM tool to set a practice tempo, then strum the chord, and let the mic feedback guide you to perfect articulation. This hands-on practice loop is the most effective way to test yourself and build muscle memory for new chords.
F# major guitar chord is also written as F#, F#maj, F#M or F#Δ.
Notes that compose the F# maj chord:
Chord Formula:
F# Maj Guitar Chord Diagrams
Position 1 Movable
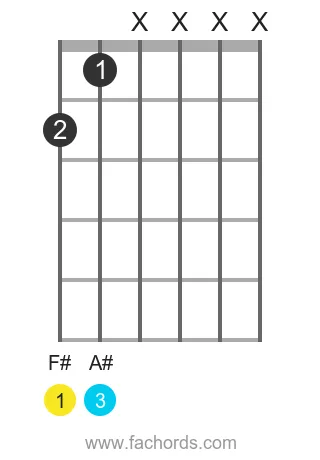
Finger Positions
- Mute the D string
- Mute the G string
- Mute the B string
- Mute the high E string
- Place your index finger (1) on the fret 1 of the A string
- Place your middle finger (2) on the fret 2 of the low E string
Position 2 Movable
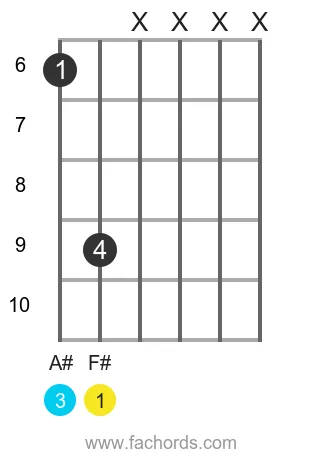
Finger Positions
- Mute the D string
- Mute the G string
- Mute the B string
- Mute the high E string
- Place your index finger (1) on the fret 6 of the low E string
- Place your pinky finger (4) on the fret 9 of the A string
Position 3 Movable

Finger Positions
- Mute the low E string
- Mute the A string
- Mute the high E string
- Place your index finger (1) on the fret 6 of the G string
- Place your middle finger (2) on the fret 7 of the B string
- Place your ring finger (3) on the fret 8 of the D string
Position 4 Movable

Finger Positions
- Mute the low E string
- Mute the A string
- Mute the D string
- Place your index finger (1) on the fret 6 of the G string
- Place your middle finger (2) on the fret 6 of the high E string
- Place your ring finger (3) on the fret 7 of the B string
Position 5 Movable
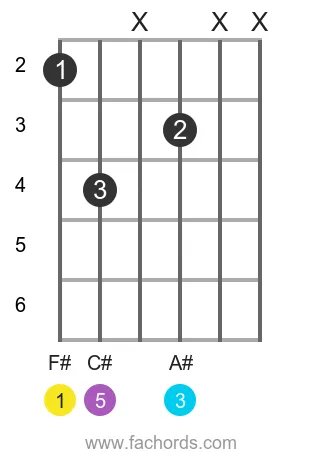
Finger Positions
- Mute the D string
- Mute the B string
- Mute the high E string
- Place your index finger (1) on the fret 2 of the low E string
- Place your middle finger (2) on the fret 3 of the G string
- Place your ring finger (3) on the fret 4 of the A string
Position 6 Movable

Finger Positions
- Mute the B string
- Mute the high E string
- Place your index finger (1) on the fret 2 of the low E string
- Place your middle finger (2) on the fret 3 of the G string
- Place your ring finger (3) on the fret 4 of the A string
- Place your pinky finger (4) on the fret 4 of the D string
Position 7 Barre Movable

Finger Positions
- Mute the low E string
- Mute the A string
- Mute the high E string
- Place your ring finger (3) on the fret 11 of the D, G and B strings at the same time
Position 8 Barre Movable

Finger Positions
- Mute the low E string
- Mute the high E string
- Place your index finger (1) on the fret 9 of the A string
- Place your ring finger (3) on the fret 11 of the D, G and B strings at the same time
Position 9 Barre Movable

Finger Positions
- Mute the low E string
- Mute the A string
- Place your index finger (1) on the fret 2 of the B and high E strings at the same time
- Place your middle finger (2) on the fret 3 of the G string
- Place your ring finger (3) on the fret 4 of the D string
Position 10 Barre Movable

Finger Positions
- Mute the low E string
- Place your index finger (1) on the fret 6 of the G and high E strings at the same time
- Place your middle finger (2) on the fret 7 of the B string
- Place your ring finger (3) on the fret 8 of the D string
- Place your pinky finger (4) on the fret 9 of the A string
Position 11 Barre Movable
Finger Positions
- Place your index finger (1) on the fret 2 of the low E, B and high E strings at the same time
- Place your middle finger (2) on the fret 3 of the G string
- Place your ring finger (3) on the fret 4 of the A string
- Place your pinky finger (4) on the fret 4 of the D string
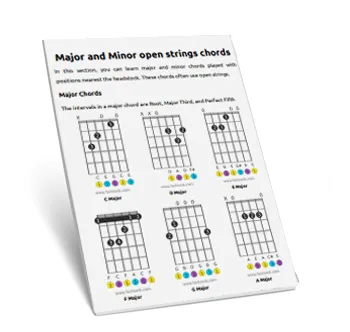
 Find more shapes in our all guitar chords online library. If you
prefer a printable pdf, download
the Free Guitar Chords Chart Pdf

Created by
Giancarlo is a musician (teaching guitar since 2000), software engineer, AI consultant and published researcher
FAQ
What notes are in the F# Major chord?
The F# Major chord is made up of three distinct notes: F#, A#, and C#.
What intervals form the F# Major chord?
The F# Major chord is formed by stacking three specific musical intervals: the 1 (Root), the 3 (Major Third), and the 5 (Perfect Fifth).
How do the notes F#, A#, and C# correspond to the 1, 3, and 5 intervals?
In the F# Major chord, the F# note is the Root (1), the A# note is the Major Third (3) above the F#, and the C# note is the Perfect Fifth (5) above the F#. These three notes in these specific interval relationships create the chord.
Why is the F# Major chord considered part of the 'Major Chords family'?
The F# Major chord is part of the Major Chords family because its structure includes a Root, a Major Third, and a Perfect Fifth. The presence of the Major Third interval is the defining characteristic that makes it a major chord.