Explore the D#m7 Guitar Chord on Our Interactive Fretboard
Want a structured chord roadmap instead of jumping between pages?
Go to the full guitar chords tutorial.
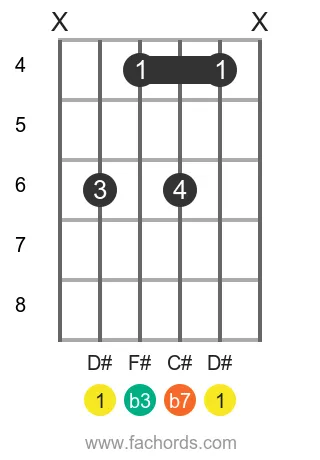
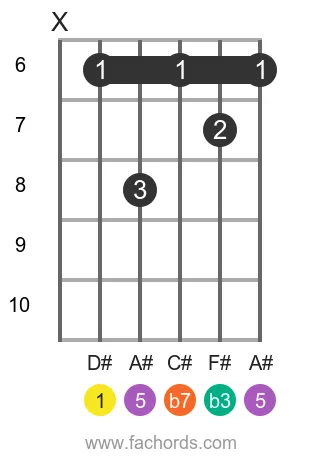
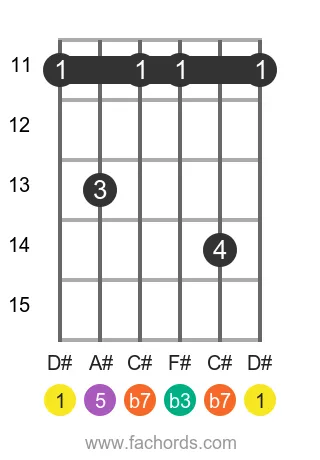
Understanding the spatial layout of the D#m7 chord across the guitar fretboard is key to unlocking its potential. Our interactive fretboard tool immediately shows you various fingerings and movable shapes for this sophisticated chord. Use the built-in play feature to hear it as a strum or arpeggio, and benefit from real-time microphone feedback to instantly confirm your accuracy as you practice. The D#m7 chord, a rich member of the minor chords family, is constructed from the notes D#, F#, A#, and C#, which correspond to the intervals Root (1), Minor Third (b3), Perfect Fifth (5), and Minor Seventh (b7).
Mastering the unique intervals of the D#m7 allows for a deeper understanding of its sophisticated sound, making it a staple in genres like jazz, adding depth and emotion to your playing. Many common D#m7 shapes involve barre techniques, and our guide on Guitar Bar Chords can help you perfect these. To delve deeper into how all chords are built, explore our comprehensive guide on Chord Construction. You can also specifically learn about Learn 3-Note 7th Chords to understand how 7th chords are simplified.
Below, you'll discover comprehensive D#m7 chord diagrams, ranging from the easiest open positions to more advanced movable shapes. We also provide additional music theory insights, popular songs featuring this chord, and a breakdown of the keys where it commonly appears. Before you commit these to memory, spend a few moments with the interactive tool above. Use the drum & BPM tool to set a rhythm, play the chord, and let the mic feedback guide you to perfect your finger placement, allowing you to explore shapes before memorizing them.
Notes of the D# m7 chord:
Tones of the Minor Seventh chord:
Guitar Patterns for the D#m7 chord
Position 1
Barre
Movable
Position 2
Barre
Movable
Position 3
Barre
Movable
 Find more shapes in our all guitar chords online library. If you
prefer a printable pdf, download
the Free Guitar Chords Chart Pdf
Find more shapes in our all guitar chords online library. If you
prefer a printable pdf, download
the Free Guitar Chords Chart Pdf
You can also use this accessible D#m7 chord page, with written diagram instructions and screen-reader support for blind users.

Created by
Giancarlo is a musician (teaching guitar since 2000), software engineer, AI consultant and published researcher
FAQ
What notes make up the D#m7 chord?
The D#m7 chord is composed of four specific notes: D# (the root), F# (the minor third), A# (the perfect fifth), and C# (the minor seventh).
What do the intervals 1, b3, 5, and b7 represent for the D#m7 chord?
These intervals define the structure of the D#m7 chord. '1' is the Root (D#), 'b3' is the Minor Third (F#), '5' is the Perfect Fifth (A#), and 'b7' is the Minor Seventh (C#). They indicate the specific relationship of each note to the root D#.
How is the D#m7 chord different from a standard D# minor chord?
A standard D# minor chord typically includes only the root (D#), minor third (F#), and perfect fifth (A#). The D#m7 chord adds an additional note, the minor seventh (C#), which gives it a richer, more complex sound than a simple minor triad.
Why is the D#m7 chord described as 'resonant' and 'complex'?
The D#m7 chord achieves its resonant and complex quality from the specific combination of its intervals, particularly the minor third (F#) and the minor seventh (C#). These two intervals together create a rich harmonic texture that contributes to its distinct sound.
In what musical contexts is the D#m7 chord typically used?
The D#m7 chord is often found in more advanced musical styles, such as jazz. Its rich and complex sound makes it suitable for adding depth and emotion to progressions, contributing a sophisticated harmonic color.