G# 7 Guitar Chord | Play, Hear and Practice Interactively
Want a structured chord roadmap instead of jumping between pages?
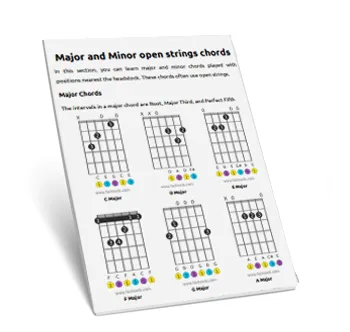
Go to the full guitar chords tutorial.
The G# 7 chord, a key member of the Dominant Chords family, is built from the notes G#, B#, D#, and F#. These correspond to the intervals 1 (Root), 3 (Major Third), 5 (Perfect Fifth), and b7 (Minor Seventh). Use the interactive fretboard tool at the top of this page to visualize every fingering, listen to the chord played as a strum or arpeggio, and check your own playing with real-time microphone feedback — the tool will tell you if you're hitting the right notes.
Understanding how chords like the G# 7 are constructed from intervals is fundamental to mastering the fretboard. This dominant chord creates a compelling tension that demands resolution, a characteristic feature that makes it essential in many musical genres. Deepen your theoretical knowledge with our tutorial on Chord Construction and explore the role of the Dominant Chord family in music. Many G# 7 voicings often involve barre shapes, so if you find those challenging, our guide to Guitar Bar Chords can help. Practice making smooth transitions with our tips to Improve Chord Changes.
As you scroll down, you'll discover multiple G# 7 chord diagrams, presented from the easiest open positions to more complex barre shapes. We'll also cover essential music theory, common songs that feature the G# 7, and the keys where this chord frequently appears. Before exploring the diagrams, take a few moments to truly experience the chord with the interactive tool above. Use the drum & BPM feature to set a tempo, strum the chord, and let the mic feedback guide your hand placement. This hands-on approach is the quickest way to integrate the G# 7 into your playing.
G# 7 chord Notes:
Chord Formula:
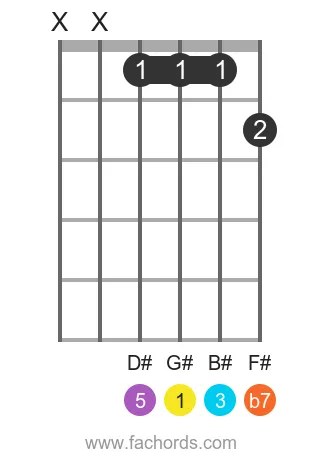
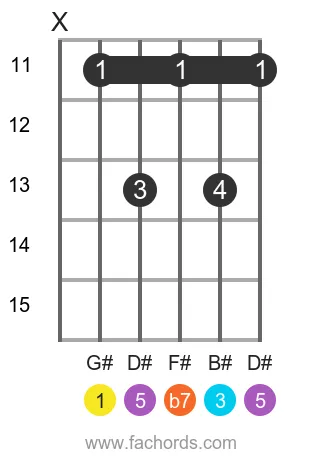
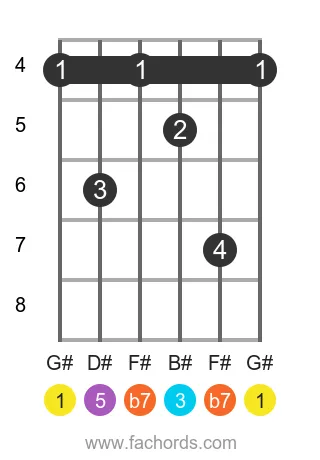
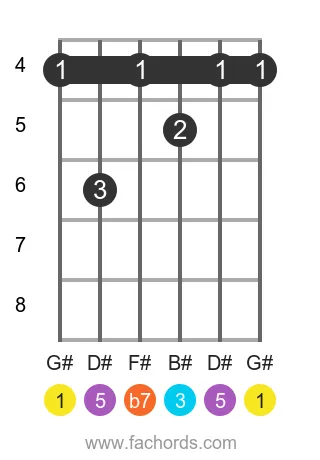
Guitar Patterns for the G# Dominant Seventh chord
Position 1
Barre
Movable
Position 2
Barre
Movable
Position 3
Barre
Movable
Position 4
Barre
Movable
 Find more shapes in our all guitar chords online library. If you
prefer a printable pdf, download
the Free Guitar Chords Chart Pdf
Find more shapes in our all guitar chords online library. If you
prefer a printable pdf, download
the Free Guitar Chords Chart Pdf
You can also use this accessible G#7 chord page, with written diagram instructions and screen-reader support for blind users.
FAQ
What makes the G#7 chord a 'Dominant Chord'?
The G#7 chord is classified as a Dominant Chord because it is built using a specific combination of intervals: a Root, a Major Third, a Perfect Fifth, and critically, a Minor Seventh (b7). This specific structure gives it a characteristic sound that creates tension and naturally leads to resolution in music, a primary function of dominant chords.
Why are the notes B# and D# included in the G#7 chord instead of C and E?
The notes B# and D# are used to accurately reflect the chord's interval structure. From the root G#, B# is the Major Third and D# is the Perfect Fifth. Using B# and D# maintains the correct diatonic spelling and function of these intervals within the chord, whereas C and E would represent different, incorrect intervals relative to G#.
What is the significance of the 'b7' (minor seventh) interval in the G#7 chord?
The 'b7' or minor seventh interval is crucial because it defines the dominant quality of the G#7 chord. This specific interval creates the inherent tension and 'pull' that dominant chords are known for, making them want to resolve to another chord. It's this minor seventh that gives the chord its distinctive sound and functional role in harmony.
How do the interval numbers 1, 3, 5, and b7 correspond to the specific notes of the G#7 chord?
In the G#7 chord, the interval numbers correspond directly to its notes: '1' represents the Root, which is G#. '3' represents the Major Third, which is B#. '5' represents the Perfect Fifth, which is D#. And 'b7' represents the Minor Seventh, which is F#. Understanding these correspondences is key to building and analyzing chords.
What does it mean for the G#7 chord to 'create tension and resolution' in music?
When the G#7 chord 'creates tension', it means it produces an unstable, expectant sound that listeners anticipate will move to a more stable chord. 'Resolution' is when the G#7 chord moves to that expected stable chord, often the tonic (like C# minor or C# major), providing a sense of arrival and completion. This tension-resolution dynamic is fundamental to how dominant chords function in musical progressions.