Understand and Play the D#9 Guitar Chord Interactively
Want a structured chord roadmap instead of jumping between pages?
Go to the full guitar chords tutorial.
The D#9 chord is constructed from the intervals Root (1), Major Third (3), Perfect Fifth (5), Minor Seventh (b7), and Major Ninth (9), which translate to the notes D#, F##, A#, C#, and E#. This rich voicing classifies it within the Dominant Chords family as a Dominant Ninth. To truly grasp its sound and structure, utilize our interactive fretboard tool to visualize fingerings across the neck and hear the chord played as either a strum or arpeggio. Practice effectively with precise real-time mic feedback, which validates your accuracy and helps refine your hand placement.
As a Dominant Ninth chord, D#9 adds a rich, jazzy extension to the basic dominant seventh sound, creating harmonic tension that often resolves to a tonic. Understanding its construction is key to unlocking its potential; dive deeper into how chords are built with our Chord Construction tutorial. For a broader perspective on its family, explore the world of Dominant Chords, and then specifically expand your knowledge of extended chords with our Ninth Chords guide.
Below, you'll discover a comprehensive collection of D#9 chord diagrams, presented from the simplest open positions to more challenging barre shapes. We also include detailed music theory insights, popular songs that feature the D#9, and the common keys where you'll encounter it. Before exploring these static resources, take a moment to engage with the interactive tool above. Use the drum machine to set a practice BPM, strum the chord, and let the mic feedback guide your hand placement. This active learning approach will solidify your understanding and technique faster than any chart alone.
Notes in the D# 9 chord:
How to create the Dominant Ninth chord:
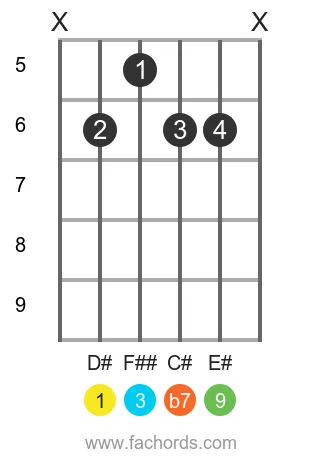
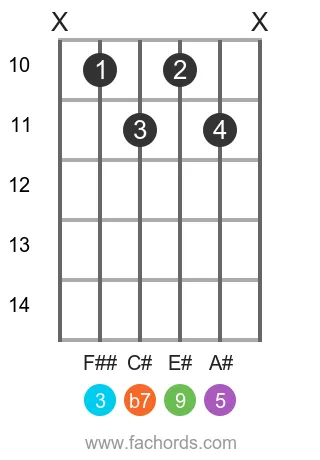
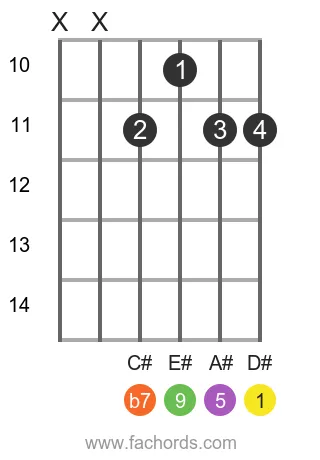
Fingerings for the D#9 guitar chord
Position 1
Movable
Position 2
Movable
Position 3
Movable
 Find more shapes in our all guitar chords online library. If you
prefer a printable pdf, download
the Free Guitar Chords Chart Pdf
Find more shapes in our all guitar chords online library. If you
prefer a printable pdf, download
the Free Guitar Chords Chart Pdf
You can also use this accessible D#9 chord page, with written diagram instructions and screen-reader support for blind users.
FAQ
What makes the D#9 a "dominant chord"?
The D#9 chord is categorized as a dominant chord because it includes a minor seventh interval (b7) above its root (C# in this case). This specific interval creates harmonic tension and a strong pull, typically leading to a resolution to another chord, which is characteristic of dominant harmony.
What are the specific notes that form the D#9 chord?
The D#9 chord is built from five distinct notes: D# (the Root), F## (the Major Third), A# (the Perfect Fifth), C# (the Minor Seventh), and E# (the Major Ninth). These notes correspond directly to the chord's defining intervals.
How does a D#9 chord differ from a D# dominant 7th chord?
A D#9 chord is an extended version of a D# dominant 7th chord. Both chords share the root (1), major third (3), perfect fifth (5), and minor seventh (b7). The distinguishing feature of the D#9 chord is the addition of the major ninth interval (E#), which adds further harmonic color and complexity.
Why are notes like F## and E# used in the D#9 chord instead of their more common enharmonic equivalents?
The use of F## for the major third and E# for the major ninth in a D#9 chord is based on correct music theory spelling. When D# is the root, these specific spellings ensure that the intervals (1, 3, 5, b7, 9) are accurately represented, maintaining the theoretical integrity of the chord and avoiding confusion with other intervals or chord types.