Practice the B m7 Chord on Guitar with Live Feedback
Want a structured chord roadmap instead of jumping between pages?
Download the step-by-step Guitar Chord Ebook
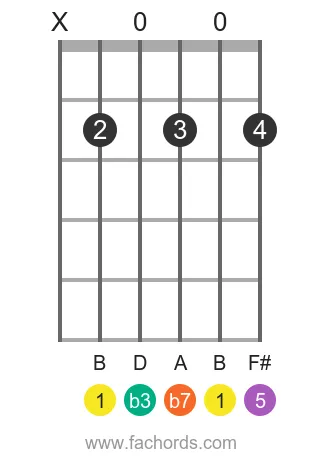
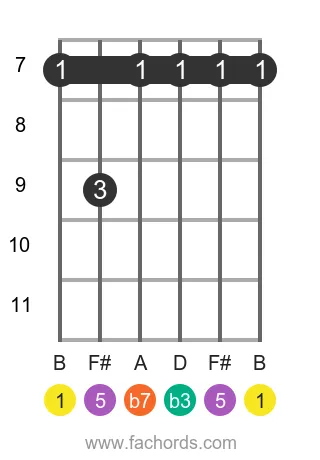
Are you struggling to hit every note perfectly in your B m7 chord? Our interactive fretboard is your personal coach. Strike the chord, and receive instant mic feedback to confirm your accuracy in real-time, ensuring you nail every fingering. This essential minor seventh chord, belonging to the Minor Chords family, is composed of the notes B, D, F#, and A, representing the intervals 1, b3, 5, and b7 (Root, Minor Third, Perfect Fifth, and Minor Seventh, respectively). Use the virtual fretboard to visualize these positions and hear them played back at any tempo.
Mastering the intervals that form the B m7 chord is key to unlocking its full potential for groove and modal playing. This chord is a cornerstone in many genres, especially for creating smooth, soulful progressions. Understanding its construction, from its root to its minor seventh, will deepen your musical intuition. For a comprehensive look at how chords are built from the ground up, explore our guide on Chord Construction. If you're focusing on efficiency, learning how to use simpler versions of 7th chords can be a game-changer; discover more with Learn 3-Note 7th Chords. Improving your ability to switch seamlessly between chords like the B m7 is also vital for fluid playing; check out tips for Improve Chords Change.
As you scroll down, you'll find various B m7 chord diagrams, arranged from the easiest to the more challenging shapes. Beyond just learning fingerings, delve into the accompanying theory to understand how this chord fits into different keys and song structures. But before you dive into static images, test your current understanding directly with our interactive tool. Play the chord, check your accuracy with mic feedback, and then use our diagrams and theory to expand your knowledge and apply the B m7 to your favorite songs.
Notes that compose the B m7 chord:
Chord Structure:
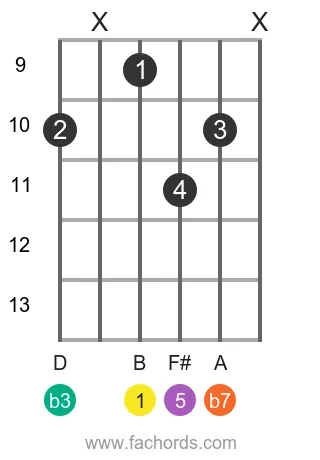
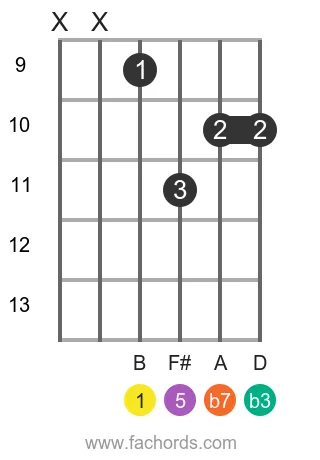
B Minor Seventh Guitar Chord Voicings
Position 1
Movable
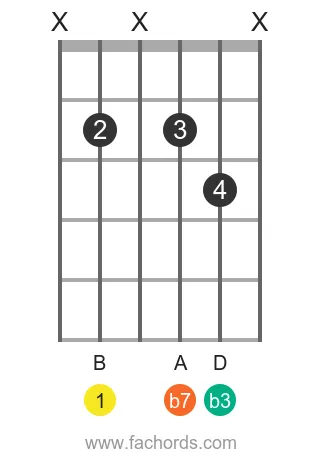
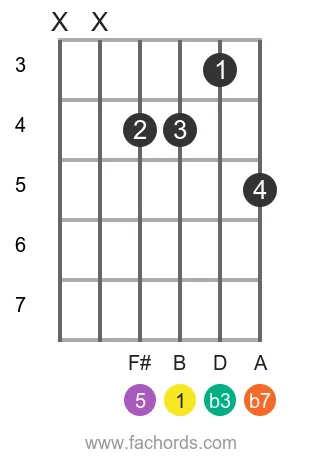
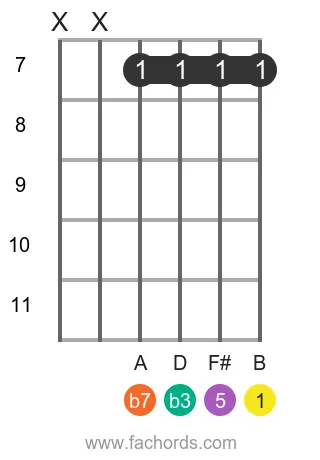
Position 2
Open
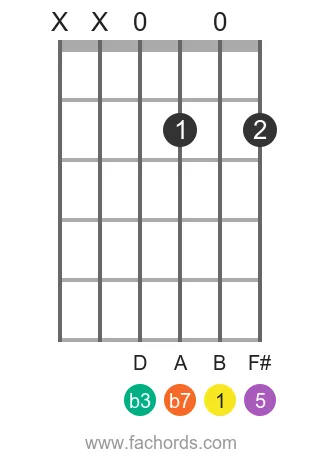
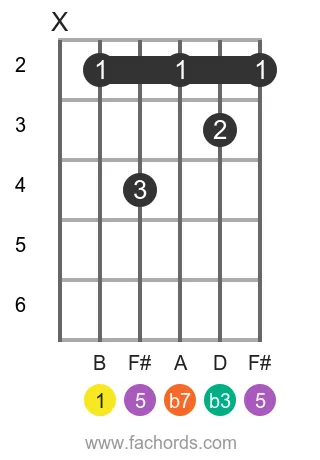
Position 3
Open

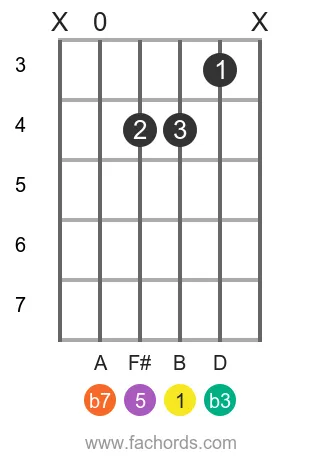
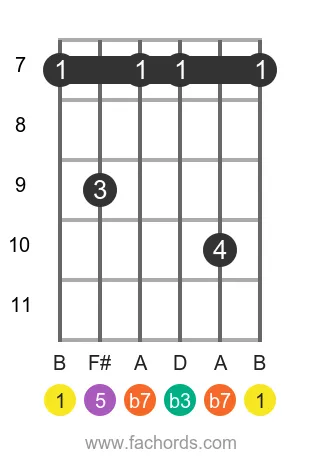
Position 4
Open

Position 5
Open
Position 6
Open
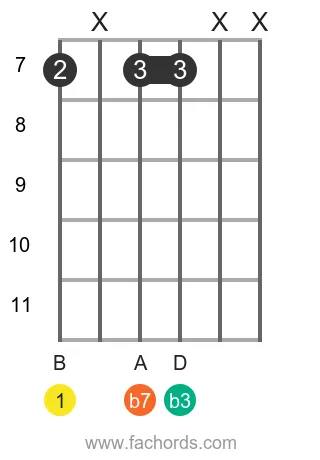
Position 7
Movable
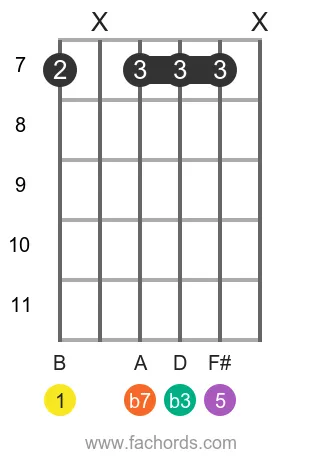
Position 8
Movable
Position 9
Barre
Movable
Position 10
Barre
Movable
Position 11
Barre
Movable
Position 12
Barre
Movable
Position 13
Barre
Movable

Position 14
Barre
Movable
Position 15
Barre
Movable
Position 16
Barre
Movable
 Find more shapes in our all guitar chords online library. If you
prefer a printable pdf, download
the Free Guitar Chords Chart Pdf
Find more shapes in our all guitar chords online library. If you
prefer a printable pdf, download
the Free Guitar Chords Chart Pdf
You can also use this accessible Bm7 chord page, with written diagram instructions and screen-reader support for blind users.
FAQ
What notes are used to build the B m7 chord?
The B m7 chord is composed of four specific notes: B, D, F#, and A. These notes are the fundamental building blocks that give the chord its unique sound.
What are the intervals that define the B m7 chord?
The B m7 chord is constructed using the intervals 1, b3, 5, and b7. These correspond to the Root (B), Minor Third (D), Perfect Fifth (F#), and Minor Seventh (A) respectively. Understanding these intervals is key to mastering the chord.
How does the B m7 chord contribute to the emotional quality of guitar playing?
The B m7 chord is described as a rich and complex chord. Its combination of a minor third and a minor seventh creates a specific harmonic texture that can effectively add depth and emotion to your guitar playing and musical compositions.
In what musical contexts is the B m7 chord commonly used?
The B m7 chord is a versatile chord that is often found as part of larger chord progressions. It is particularly common and frequently used in jazz chord progressions, adding sophistication and harmonic interest.
What does the notation 'm7' in B m7 signify regarding its composition?
The 'm7' in the B m7 notation directly signifies the specific intervals that make up the chord. The 'm' indicates the presence of a minor third (b3) from the root, and the '7' indicates the presence of a minor seventh (b7) from the root. This notation efficiently communicates its unique interval structure.