Master the A# 7#9 Guitar Chord: Play & Get Feedback
Want a structured chord roadmap instead of jumping between pages?
Go to the full guitar chords tutorial.

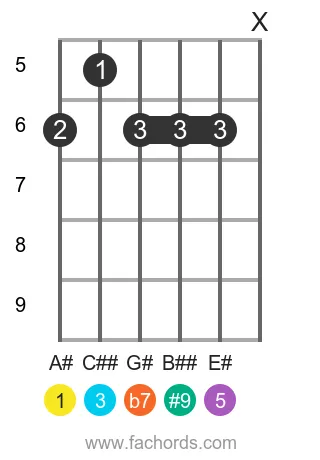
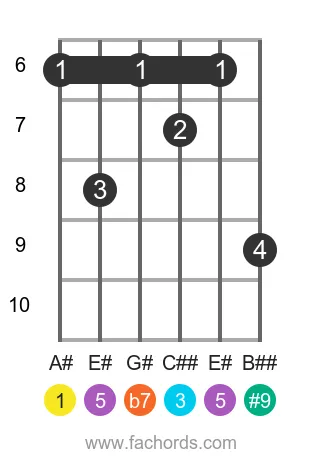
Ready to tackle the complex A# 7(#9) chord? Dive straight in with our interactive fretboard tool and immediately verify your finger placement and accuracy using the real-time microphone feedback. Visualize every fingering, and hear the chord played as a strum or arpeggio. This captivating member of the Dominant Chords family is constructed from the notes A#, C##, E#, G#, and B##, corresponding to the intervals 1 (Root), 3 (Major Third), 5 (Perfect Fifth), b7 (Minor Seventh), and #9 (Augmented Ninth).
With its augmented ninth, the A# 7(#9) chord adds a distinct color and tension, frequently enriching jazz, blues, and funk progressions. To truly grasp its harmonic role and why this extended harmony sounds so unique, explore our guide on Dominant Chords. Delve deeper into its sophisticated construction with our tutorial on Ninth Chords, and for a fundamental understanding of how these complex structures are built, check out our comprehensive guide to Chord Construction.
Below, you'll discover comprehensive chord diagrams, arranged from the easiest open positions to more challenging movable shapes, alongside detailed music theory, popular songs that feature the A# 7(#9) chord, and the musical keys where it shines. Before you explore the diagrams, challenge yourself with the interactive tool above. Set a comfortable tempo with the drum & BPM practice tool, strum the chord, and let the mic feedback continuously confirm your accuracy. This hands-on, auditory testing is the fastest way to truly master this powerful chord.
Notes in the A# 7(#9) chord:
Tones of the Dominant Seventh Sharp Ninth Added chord:
Guitar Patterns for the A#7(#9) chord
Position 1
Open
Position 2
Barre
Movable
Position 3
Barre
Movable
 Find more shapes in our all guitar chords online library. If you
prefer a printable pdf, download
the Free Guitar Chords Chart Pdf
Find more shapes in our all guitar chords online library. If you
prefer a printable pdf, download
the Free Guitar Chords Chart Pdf
You can also use this accessible A#7(#9) chord page, with written diagram instructions and screen-reader support for blind users.

Created by
Giancarlo is a musician (teaching guitar since 2000), software engineer, AI consultant and published researcher
FAQ
What specific notes and intervals make up the A# 7(#9) chord?
The A# 7(#9) chord is composed of the notes A#, C##, E#, G#, and B##. These notes correspond to the intervals of a 1 (Root), 3 (Major Third), 5 (Perfect Fifth), b7 (Minor Seventh), and #9 (Augmented Ninth), all stacked from the root note A#.
Why is the A# 7(#9) considered a 'complex' chord for guitarists?
The A# 7(#9) chord is deemed complex because it's an advanced dominant chord that extends beyond a basic triad or dominant 7th. It includes an augmented ninth (#9) interval, which creates a richer, more tension-filled sound. Mastering it requires familiarity with advanced chord structures and fingerings.
How does the #9 interval uniquely affect the sound of a dominant 7th chord?
The #9 (augmented ninth) interval adds a distinctive, often 'captivating' and edgy harmonic tension to a dominant 7th chord. It creates a richer, more sophisticated tonal color compared to a basic dominant 7th, which is why it's a staple in genres like jazz for adding specific harmonic flavor.
In what musical contexts or genres is the A# 7(#9) chord typically used?
As a dominant chord, the A# 7(#9) is commonly found in various music genres. It is particularly a staple in jazz chord progressions, where its complex and tension-filled sound can add a sophisticated touch and lead effectively into subsequent chords.
Why are there double sharps (C## and B##) in the notes of the A# 7(#9) chord?
The specific notes of the A# 7(#9) chord, including C## and B##, are derived directly from stacking its defined intervals (1, 3, 5, b7, #9) from the root A#. Using these precise spellings ensures the theoretical integrity of each interval relative to the root, clearly defining the chord's exact harmonic structure.
How can visualizing chord diagrams and fretboard patterns help in learning the A# 7(#9) chord?
Visualizing the A# 7(#9) chord through diagrams and fretboard patterns helps guitarists clearly see the exact placement of each individual note (A#, C##, E#, G#, B##) on the guitar neck. This visual aid makes it easier to understand the chord's structure, learn its fingerings, and internalize its composition.